New Pattern: April Cowl

april cowl 5616

The April Cowl test knit is finished and the pattern is now available! The April Cowl uses simple knits, yarn overs and decreases to evoke the new shoots and sprouts of early spring growth.

april cowl 5644

April is extra-long for a draped-scarf feel. Lace written and charted.

april cowl 5771

I really love this one and have been wearing it more and more as this spring seems to be dragging along. I even wore my April Cowl to show it off at my first ever knitting conference.


Pattern Spotlight: Lily Cowl and Tee

Lily 1

Published in March of 2016 the Lily Cowl uses simple knits, purls, yarn overs and decreases in a modern nod to the classic Lily of the Valley. The lace is my modernized version of the classic with the purl strips and knots removed.

Lily 2

The Lily Cowl is available through Ravelry, WEBS, LoveKnitting and Craftsy!

Sometimes I love a stitch pattern so much that I incorporate it into other designs. And I did that with my modernize lily lace using it also for my Lily Tee.

Lily Tee 2

2016

The Lily Tee was published in July of 2016. Lily is one of my series of simple top down tees. Each of my tees have a different neckline and different lace at the bottom of the sleeves and body.

Lily Tee 3

Lily is a scoop neck and the lace is my same modernized version of the classic Lily of the Valley. Tunic length with instructions to shorten if desired. Waist and hip shaping for flattering fit. Written in 7 sizes.

Lily Tee 4

Lily Tee is available through Ravelry, WEBS and LoveKnitting!


New Pattern: Judy

christmas basket 5128

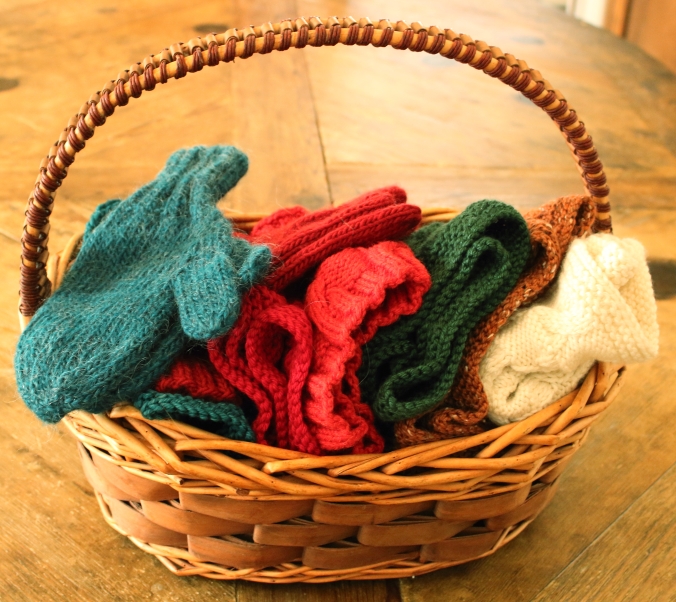
Every year I fill a Christmas Basket for the holidays and take it around as we visit family and friends to let everyone pick their favorite piece as a gift. Here is a picture of a partially emptied Christmas Basket from our 2017 holidays. If you look close at the basket above, you’ll notice that you see exactly zero ponytail hats in it. That’s because they were snatched up as fast as I could knit them this season. I’m not exaggerating to say that several of them were claimed before they got off the needles and worn immediately after I sewed in the ends.

finished hat flat 5173

I made the same hat over and over again with no variation to the number of cast-on stitches or the yarn (except colors). It fit a little slouchy on Corrine, just right on Amanda and Kaylene, a little loose Tessie, a little tight on Naomi and so on………you get the picture – one size really did fit most. Also, I made a lot of them over the holidays.

From time to time I like to offer a free pattern. So, I’m releasing this simple one-size ponytail hat recipe for free. Find the pattern here. (Named Judy after a sweet pony from my childhood.)

As an added bonus, here is a look at some of the steps from yarn to hat. (I think I might actually get to keep this one for myself since the holidays are long over!)


My tools for this hat started with The Knitter’s Handy Book of Patterns by Ann Budd and Knit Picks self-striping Felici Worsted. I worked up a simple gauge swatch to decide which needles worked best for me with this yarn and to measure my gauge. It would take a whole blog post to say everything I think about gauge swatches – so I’ll shorten that to just say I think they are definitely worth the time it takes to cast on 20-ish stitches and work for a couple inches in whatever stitch pattern you plan to use for your project.


From my gauge and the tables in the book I determined a number of cast-on stitches I hoped would be generic enough to fit most head sizes and I worked 2×2 ribbing for an extremely long ribbing section of 2.5″. My reasoning was that knit fabric is stretchy so that would help with any heads that were a little larger than my guessed generic size and ribbing helps tighten the stretchy so that would help with any heads that were a little smaller than my guessed generic size.

keep going 5109

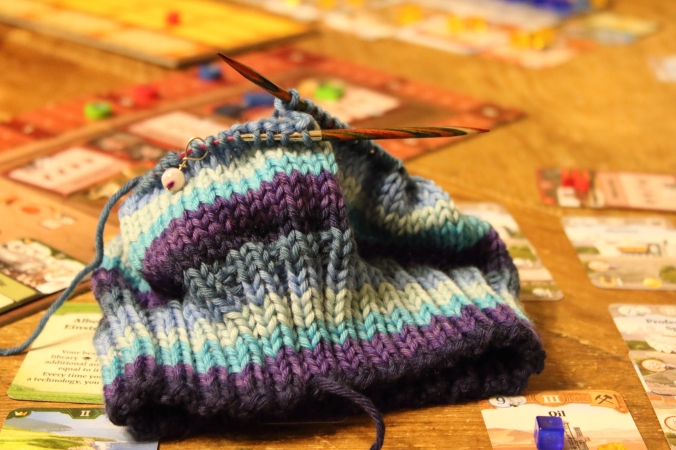
After that I switched to stockinette stitch and knit every round until the hat measures 8.25″ from the cast-on edge. That turned out to be just the right length for some heads and slightly slouchy for other heads. (If you’re looking closely at the background on these photos, you’ll notice that I knit almost this whole hat between my turns while we played a very long family board game one Saturday afternoon.)


Since this is a simple ponytail hat the decreases are very down and dirty from at this point and accomplished over just 4 rounds – a first decrease round of k2tog around, a knit round, a second decrease round of k2tog and a final knit round. Then I bound off all remaining stitches loosely in knit and sewed in the ends.


Now I’m going to try to keep a hold of it before someone else claims it!! I put a link to the free pattern earlier in this blog post. But I’m including it again here just in case you’ve made it to the end without clicking the earlier link.


New Release: Alana

The Knit Now issue 83 is out! It is full of beautiful projects including my Alana Pullover!

alana pullover CY8B2544_medium2

All photos courtesy of Knit Now magazine.

Alana combines a center front cable panel and complementary sleeve cables with top-down constructions for casual elegance.

Named for the Celtic word for stone and harmony, Alana is a quick and easy knit. Written in 7 sizes.

Includes waist and hip shaping for a flattering fit. Cables are charted and written.

Sample knit in West Yorkshire Spinners The Croft Shetland Tweed Aran. When I knit the sample garment, the yarn was brand new and needed to be kept a secret. A quick google search shows it is available now from multiple retailers and I’m thrilled to be able to share it! It was a blast to work with and I really loved the finished garment.

Find this issue at your local yarn shop or bookstore or purchase the digital edition here!

Designing: The Chalkboard Method

Earlier this year I felt like I was in a little bit of a rut as I grow my knitwear design business. I was doing the work, putting in the hours and things were happening.

old list 4343

But at the end of each month when it was time to evaluate my goals for the month, I’d go to my tiny list on the bottom of the monthly calendar and see that I hadn’t quite managed everything. So I went looking for resources and found the Being Boss Podcast. I started randomly picking back episodes that sounded the most helpful to me. One of the first I listened to was Episode #79 on using the Chalkboard Method to set goals near the end of July 2017.

The idea of the Chalkboard Method is to write your goals big and bold in a space that you will see every day while you work with large spaces to fill in as you meet your goals. This sounded perfect for me! Not only would it make sure I saw my goals every day, it would help me focus on where I still had the most open spaces as the quarter progressed. Because it was a podcast, I couldn’t quite visualize how theirs looked so I made up a board that made sense for my goals.

first attempt 4331

I was so excited I made this 9×11 sheet of goals immediately for the 3rd Quarter and shared it on my Instagram.

Thinking about my goals in quarters instead of in months was the first important step for me. And I actually got it wrong the first time. I was so excited to get started that I wrote a list of achievable goals for a 3-month period….and then realized I only had a little more than 2 months of the quarter left to accomplish them. I decided to leave my goals as written and cut myself some slack if I didn’t complete them since I would be working with many fewer days than I’d originally planned. I transferred the goals to a re-purposed poster board from a middle school science project and put it right behind my laptop on my desk where I could see the goals every day. It worked amazingly well for me. I completed all of my goals even with those fewer days!

fourth quarter 4333

I added more detail and more goals for my fourth quarter. 

It worked so well that I did it again for the fourth quarter with more goals and more detail. Again I met or exceeded all of my goals. In 2017, I published 15 patterns, made more than 32 pattern submissions, had one pattern published in a book, sold several patterns to yarn companies and magazines. I’m excited by my 2017 achievements and my forward momentum that picked up since I started using the Chalkboard Method in my third quarter!

I can’t really explain the magic behind it since the concept seems so simple as to be almost silly. But it truly works for me. I’ve always been a list maker and goal oriented. But somehow writing them small made it easy to get off course. While writing them great big really increases my productivity and focus. I’m definitely a convert and plan to continue the process. In fact, when a friend offered me a re-store find of an 8-foot chalk board I said YES!  Because writing the goals even bigger and having the space to grow my goals can’t hurt.

first quarter and new big board 4338

My Chalkboard Goals now cover the entire wall behind my desk. I even gave up a window for it. 

I’m excited to see where 2018 takes me!


New Release: Clare Pullover

The Winter 2017 Love of Knitting is out! It’s full of beautiful projects including my Clare Pullover!

LOKWN17_11716

Knit in Rowan Pure Wool Superwash the Clare Pullover combines a cabled round yoke with complementary textured edging on the body and sleeves for a chic finished sweater.

LOKWN17_11753

Clare is worked in the round top-down with simple stockinette between cables at the top  and then again at the hem and sleeve cuffs. Sleeves are worked in the round top down.

LOKWN17_11735

Written in 7 sizes. Includes waist and hip shaping for a flattering fit. Cables charted and written.

LOKWN17_11723

Find this issue at your local yarn shop or bookstore or purchase the digital edition here!


Tutorial: Garter Tab Cast-On

Rock Art Shawl Collage

The Rock Art Shawl uses the garter tab cast-on to blend seamlessly with the garter stitch edging and form a smooth finish to the center top line of the shawl. The initial instructions can be confusing, but it is well worth the extra effort!

Once you understand the basic plan, the process is simple. I took pictures of a recent sample shawl as I worked and below I walk you through my process. Like many other top-down triangle shawls, the Rock Art Shawl starts at the center top with just a few stitches.

For the initial cast-on the first lines of the pattern read “Garter Tab cast-on: Loosely cast on 2 sts. Knit 7 rows. After the last row, gently stretch your rectangle up to form a line with your 2 live sts. Pick up and knit 3 sts in the garter ridges along the edge of your rectangle. Pick up and knit 2 sts from the cast-on edge. (7 sts)” See photos below for the steps.

garter tab step 1garter tab step 2garter tab step 3garter tab step 4

Voila! You’ve finished the garter tab cast-on.

top with garter tab caston2879

You can see here how it forms a smooth top horizontal line for the tiny sample shawl. From here the Rock Art Shawl shawl grows down the body with garter stitch edges, yarn over increases and two sides separated by the center stitch.

You can skip the garter tab and cast on your first 7 stitches however you like best. But do be aware of the center dip and break in the top horizontal edge of the shawl that will result.

top of shawl without garter tab 2857

You can see here what I mean. It really is hard to miss that center dip.

The Rock Art Shawl is in test knitting and will be available as part of my Arizona Collection along with the Grand Canyon Scarf and Sedona Cowl later this Fall.